Istio 周边网格入门
Istio 周边网格入门的分步指南。
周边网格是 今天引入 Istio 的一种新的数据平面模式。按照本入门指南,您可以体验周边网格如何简化应用程序入网、帮助进行持续运营以及减少服务网格基础设施资源使用。
使用环境模式安装 Istio
- 下载 Istio 的预览版本,该版本支持周边网格。
- 查看 支持的环境。我们建议使用版本 1.21 或更高版本的 Kubernetes 集群,该集群至少有两个节点。如果您没有 Kubernetes 集群,则可以使用本地设置(例如,使用 kind 如下所示)或在 Google 或 AWS 云中部署一个。
$ kind create cluster --config=- <<EOF
kind: Cluster
apiVersion: kind.x-k8s.io/v1alpha4
name: ambient
nodes:
- role: control-plane
- role: worker
- role: worker
EOF
ambient 配置文件旨在帮助您开始使用周边网格。使用上面下载的 istioctl,在您的 Kubernetes 集群上使用 ambient 配置文件安装 Istio。
$ istioctl install --set profile=ambient
运行上述命令后,您将获得以下输出,指示这四个组件已成功安装!
✔ Istio core installed
✔ Istiod installed
✔ Ingress gateways installed
✔ CNI installed
✔ Installation complete
默认情况下,环境配置文件启用了 Istio 核心、Istiod、入口网关、零信任隧道代理 (ztunnel) 和 CNI 插件。Istio CNI 插件负责检测哪些应用程序 Pod 是周边网格的一部分,并配置 ztunnel 之间的流量重定向。您会注意到以下 Pod 已使用默认环境配置文件安装在 istio-system 命名空间中。
$ kubectl get pod -n istio-system
NAME                                    READY   STATUS    RESTARTS   AGE
istio-cni-node-97p9l                    1/1     Running   0          29s
istio-cni-node-rtnvr                    1/1     Running   0          29s
istio-cni-node-vkqzv                    1/1     Running   0          29s
istio-ingressgateway-5dc9759c74-xlp2j   1/1     Running   0          29s
istiod-64f6d7db7c-dq8lt                 1/1     Running   0          47s
ztunnel-bq6w2                           1/1     Running   0          47s
ztunnel-tcn4m                           1/1     Running   0          47s
ztunnel-tm9zl                           1/1     Running   0          47s
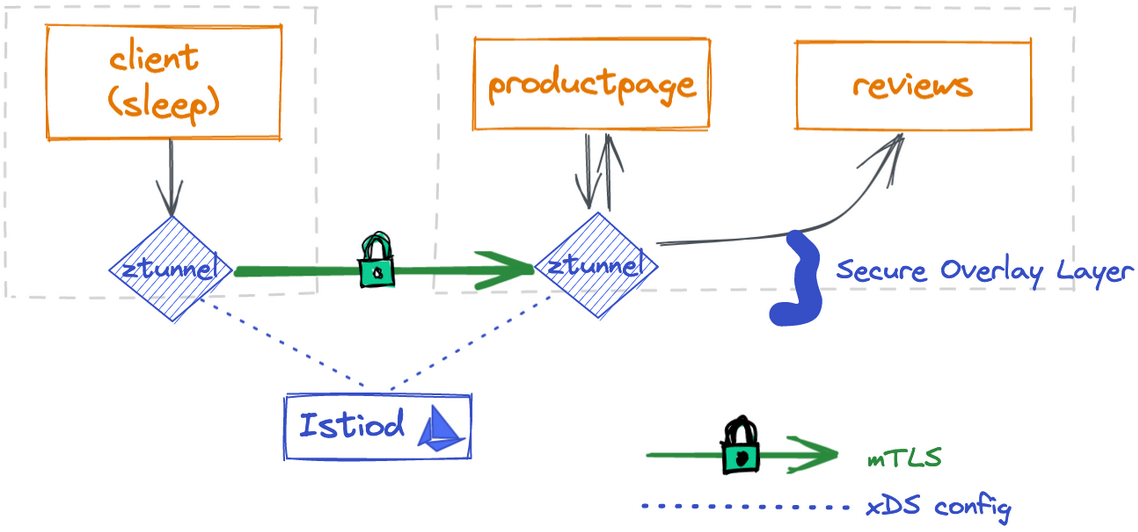
istio-cni 和 ztunnel 组件作为 Kubernetes DaemonSets 部署,并在每个节点上运行。每个 Istio CNI Pod 检查同一节点上所有 Pod,以查看这些 Pod 是否是周边网格的一部分。对于这些 Pod,CNI 插件配置流量重定向,以便所有传入和传出 Pod 的流量首先重定向到同一节点上的 ztunnel。当节点上部署或删除新的 Pod 时,CNI 插件会继续监视并相应地更新重定向逻辑。
部署您的应用程序
您将使用示例 bookinfo 应用程序,该应用程序是您先前步骤中下载的 Istio 的一部分。在环境模式下,您完全按照在没有 Istio 的情况下部署应用程序的方式将应用程序部署到您的 Kubernetes 集群。这意味着您可以在启用环境网格之前让您的应用程序在 Kubernetes 中运行,并且可以使它们加入网格,而无需重新启动或重新配置您的应用程序。
$ kubectl apply -f samples/bookinfo/platform/kube/bookinfo.yaml
$ kubectl apply -f https://raw.githubusercontent.com/linsun/sample-apps/main/sleep/sleep.yaml
$ kubectl apply -f https://raw.githubusercontent.com/linsun/sample-apps/main/sleep/notsleep.yaml
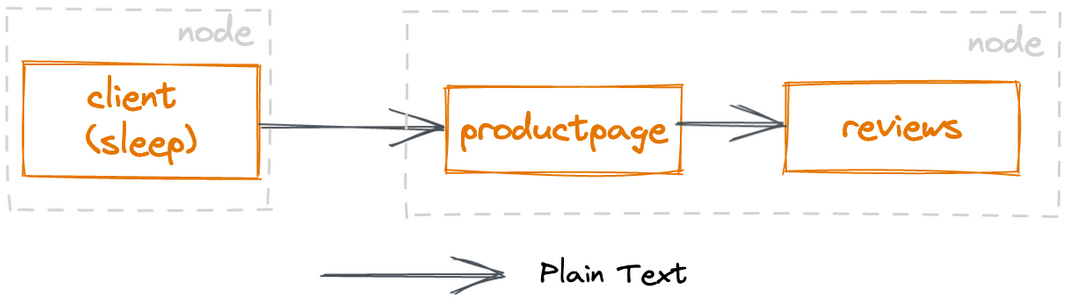
注意:sleep 和 notsleep 是两个可以用作 curl 客户端的简单应用程序。
将 productpage 连接到 Istio 入口网关,以便您可以从集群外部访问 bookinfo 应用。
$ kubectl apply -f samples/bookinfo/networking/bookinfo-gateway.yaml
测试您的 bookinfo 应用程序,它应该在有或没有网关的情况下都能工作。注意:如果它有一个负载均衡器 IP(或主机名),您可以用它替换下面的 istio-ingressgateway.istio-system。
$ kubectl exec deploy/sleep -- curl -s http://istio-ingressgateway.istio-system/productpage | head -n1
$ kubectl exec deploy/sleep -- curl -s http://productpage:9080/ | head -n1
$ kubectl exec deploy/notsleep -- curl -s http://productpage:9080/ | head -n1
将您的应用程序添加到周边网格
您可以通过简单地标记命名空间来启用给定命名空间中的所有 Pod 成为周边网格的一部分。
$ kubectl label namespace default istio.io/dataplane-mode=ambient
恭喜!您已成功将默认命名空间中的所有 Pod 添加到周边网格。最棒的是,无需重新启动或重新部署任何内容!
发送一些测试流量
$ kubectl exec deploy/sleep -- curl -s http://istio-ingressgateway.istio-system/productpage | head -n1
$ kubectl exec deploy/sleep -- curl -s http://productpage:9080/ | head -n1
$ kubectl exec deploy/notsleep -- curl -s http://productpage:9080/ | head -n1
您将立即获得周边网格中应用程序之间的 mTLS 通信。
如果您对每个身份的 X.509 证书感到好奇,您可以通过逐步浏览证书来了解更多信息。
$ istioctl pc secret ds/ztunnel -n istio-system -o json | jq -r '.dynamicActiveSecrets[0].secret.tlsCertificate.certificateChain.inlineBytes' | base64 --decode | openssl x509 -noout -text -in /dev/stdin
例如,输出显示了 sleep 主体的证书,该证书有效期为 24 小时,由本地 Kubernetes 集群颁发。
Certificate:
    Data:
        Version: 3 (0x2)
        Serial Number: 307564724378612391645160879542592778778 (0xe762cfae32a3b8e3e50cb9abad32b21a)
    Signature Algorithm: SHA256-RSA
        Issuer: O=cluster.local
        Validity
            Not Before: Aug 29 21:00:14 2022 UTC
            Not After : Aug 30 21:02:14 2022 UTC
        Subject:
        Subject Public Key Info:
            Public Key Algorithm: RSA
                Public-Key: (2048 bit)
                Modulus:
                    ac:db:1a:77:72:8a:99:28:4a:0c:7e:43:fa:ff:35:
                    75:aa:88:4b:80:4f:86:ca:69:59:1c:b5:16:7b:71:
                    dd:74:57:e2:bc:cf:ed:29:7d:7b:fa:a2:c9:06:e6:
                    d6:41:43:2a:3c:2c:18:8e:e8:17:f6:82:7a:64:5f:
                    c4:8a:a4:cd:f1:4a:9c:3f:e0:cc:c5:d5:79:49:37:
                    30:10:1b:97:94:2c:b7:1b:ed:a2:62:d9:3b:cd:3b:
                    12:c9:b2:6c:3c:2c:ac:54:5b:a7:79:97:fb:55:89:
                    ca:08:0e:2e:2a:b8:d2:e0:3b:df:b2:21:99:06:1b:
                    60:0d:e8:9d:91:dc:93:2f:7c:27:af:3e:fc:42:99:
                    69:03:9c:05:0b:c2:11:25:1f:71:f0:8a:b1:da:4a:
                    da:11:7c:b4:14:df:6e:75:38:55:29:53:63:f5:56:
                    15:d9:6f:e6:eb:be:61:e4:ce:4b:2a:f9:cb:a6:7f:
                    84:b7:4c:e4:39:c1:4b:1b:d4:4c:70:ac:98:95:fe:
                    3e:ea:5a:2c:6c:12:7d:4e:24:ab:dc:0e:8f:bc:88:
                    02:f2:66:c9:12:f0:f7:9e:23:c9:e2:4d:87:75:b8:
                    17:97:3c:96:83:84:3f:d1:02:6d:1c:17:1a:43:ce:
                    68:e2:f3:d7:dd:9e:a6:7d:d3:12:aa:f5:62:91:d9:
                    8d
                Exponent: 65537 (0x10001)
        X509v3 extensions:
            X509v3 Key Usage: critical
                Digital Signature, Key Encipherment
            X509v3 Extended Key Usage:
                Server Authentication, Client Authentication
            X509v3 Basic Constraints: critical
                CA:FALSE
            X509v3 Authority Key Identifier:
                keyid:93:49:C1:B8:AB:BF:0F:7D:44:69:5A:C3:2A:7A:3C:79:19:BE:6A:B7
            X509v3 Subject Alternative Name: critical
                URI:spiffe://cluster.local/ns/default/sa/sleep
注意:如果您没有得到任何输出,则可能意味着 ds/ztunnel 选择了一个不管理任何证书的节点。您可以指定一个特定的 ztunnel Pod(例如,istioctl pc secret ztunnel-tcn4m -n istio-system),该 Pod 管理示例应用程序 Pod 中的任何一个,而不是管理所有 Pod。
安全应用程序访问
将您的应用程序添加到周边网格后,您可以使用 L4 授权策略来保护应用程序访问。这使您可以根据客户端工作负载身份控制对服务和来自服务的访问,而不是在 L7 层(例如,GET 和 POST 等 HTTP 方法)控制访问。
L4 授权策略
显式允许 sleep 服务帐户和 istio-ingressgateway 服务帐户调用 productpage 服务。
$ kubectl apply -f - <<EOF
apiVersion: security.istio.io/v1beta1
kind: AuthorizationPolicy
metadata:
 name: productpage-viewer
 namespace: default
spec:
 selector:
   matchLabels:
     app: productpage
 action: ALLOW
 rules:
 - from:
   - source:
       principals: ["cluster.local/ns/default/sa/sleep", "cluster.local/ns/istio-system/sa/istio-ingressgateway-service-account"]
EOF
确认上述授权策略是否有效。
$ # this should succeed
$ kubectl exec deploy/sleep -- curl -s http://istio-ingressgateway.istio-system/productpage | head -n1
$ # this should succeed
$ kubectl exec deploy/sleep -- curl -s http://productpage:9080/ | head -n1
$ # this should fail with an empty reply
$ kubectl exec deploy/notsleep -- curl -s http://productpage:9080/ | head -n1
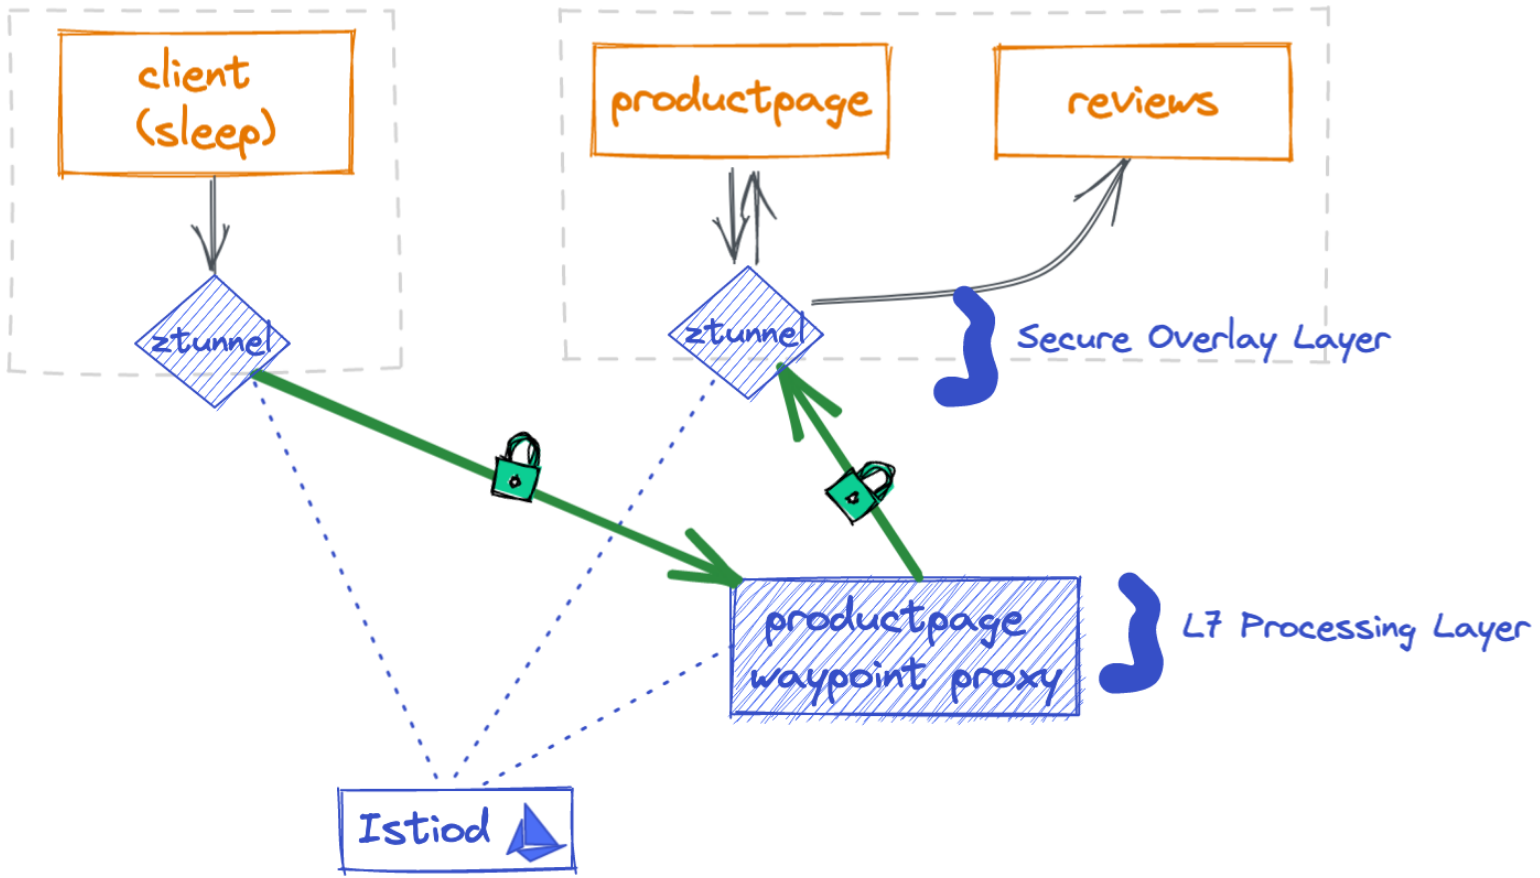
第 7 层授权策略
使用 Kubernetes 网关 API,您可以为 productpage 服务部署一个路标代理,该代理使用 bookinfo-productpage 服务帐户。任何到达 productpage 服务的流量都将由第 7 层 (L7) 代理进行中介、强制和观察。
$ kubectl apply -f - <<EOF
apiVersion: gateway.networking.k8s.io/v1beta1
kind: Gateway
metadata:
 name: productpage
 annotations:
   istio.io/service-account: bookinfo-productpage
spec:
 gatewayClassName: istio-mesh
EOF
请注意,路标代理的 gatewayClassName 必须为 istio-mesh。
查看 productpage 路标代理状态;您应该会看到网关资源的详细信息,状态为 Ready。
$ kubectl get gateway productpage -o yaml
...
status:
  conditions:
  - lastTransitionTime: "2022-09-06T20:24:41Z"
    message: Deployed waypoint proxy to "default" namespace for "bookinfo-productpage"
      service account
    observedGeneration: 1
    reason: Ready
    status: "True"
    type: Ready
更新我们的 AuthorizationPolicy 以显式允许 sleep 服务帐户和 istio-ingressgateway 服务帐户 GET productpage 服务,但不执行任何其他操作。
$ kubectl apply -f - <<EOF
apiVersion: security.istio.io/v1beta1
kind: AuthorizationPolicy
metadata:
 name: productpage-viewer
 namespace: default
spec:
 selector:
   matchLabels:
     app: productpage
 action: ALLOW
 rules:
 - from:
   - source:
       principals: ["cluster.local/ns/default/sa/sleep", "cluster.local/ns/istio-system/sa/istio-ingressgateway-service-account"]
   to:
   - operation:
       methods: ["GET"]
EOF
确认上述授权策略是否有效。
$ # this should fail with an RBAC error because it is not a GET operation
$ kubectl exec deploy/sleep -- curl -s http://productpage:9080/ -X DELETE | head -n1
$ # this should fail with an RBAC error because the identity is not allowed
$ kubectl exec deploy/notsleep -- curl -s http://productpage:9080/  | head -n1
$ # this should continue to work
$ kubectl exec deploy/sleep -- curl -s http://productpage:9080/ | head -n1
部署 productpage 路标代理后,您还将自动获得对 productpage 服务的所有请求的 L7 指标。
$ kubectl exec deploy/bookinfo-productpage-waypoint-proxy -- curl -s https://:15020/stats/prometheus | grep istio_requests_total
您会注意到指标 response_code=403 和一些指标 response_code=200,如下所示。
istio_requests_total{
  response_code="403",
  source_workload="notsleep",
  source_workload_namespace="default",
  source_principal="spiffe://cluster.local/ns/default/sa/notsleep",
  destination_workload="productpage-v1",
  destination_principal="spiffe://cluster.local/ns/default/sa/bookinfo-productpage",
  connection_security_policy="mutual_tls",
  ...
}
该指标显示了当源工作负载 (notsleep) 通过 mTLS 连接调用目标工作负载 (productpage-v1) 以及源和目标主体时,有两个 403 响应。
控制流量
为 review 服务部署一个路标代理,使用 bookinfo-review 服务帐户,以便任何到达 review 服务的流量都将由路标代理进行中介。
$ kubectl apply -f - <<EOF
apiVersion: gateway.networking.k8s.io/v1beta1
kind: Gateway
metadata:
 name: reviews
 annotations:
   istio.io/service-account: bookinfo-reviews
spec:
 gatewayClassName: istio-mesh
EOF
应用 reviews 虚拟服务以将 90% 的流量控制到 reviews v1,并将 10% 的流量控制到 reviews v2。
$ kubectl apply -f samples/bookinfo/networking/virtual-service-reviews-90-10.yaml
$ kubectl apply -f samples/bookinfo/networking/destination-rule-reviews.yaml
确认来自 100 个请求的大约 10% 的流量到达 reviews-v2。
$ kubectl exec -it deploy/sleep -- sh -c 'for i in $(seq 1 100); do curl -s http://istio-ingressgateway.istio-system/productpage | grep reviews-v.-; done'
总结
无论您选择使用 sidecar 还是环境数据平面模式,现有的 Istio 资源都将继续工作。
观看简短视频,观看林在 5 分钟内演示 Istio 周边网格。
接下来是什么
我们对新的 Istio 周边数据平面及其简单的“环境”架构感到非常兴奋。使用环境模式将您的应用程序入网到服务网格现在就像标记命名空间一样简单。您的应用程序将获得即时优势,例如网格流量的具有加密身份的 mTLS 和 L4 可观察性。如果您需要控制访问或路由、提高弹性或在周边网格中的应用程序之间获得 L7 指标,则可以根据需要将路标代理应用于您的应用程序。我们非常喜欢只为我们需要的付费,因为它不仅可以节省资源,还可以节省不断更新许多代理的操作成本!我们邀请您尝试新的 Istio 周边数据平面架构,体验其简单性。我们期待您在 Istio 社区中提供 反馈!


